Getting rid of duplicates on Wikidata

When we edit Wikidata we often come across duplicates. These can be caused by ingestion scripts running without checks, or editors adding items without investigating whether another item for the same entity already exists.

Of course, there will also be items with the same or similar labels (or names) which identify different things. Think apple and Apple, or indeed Apple. But in this case we are speaking about the same ‘thing’.

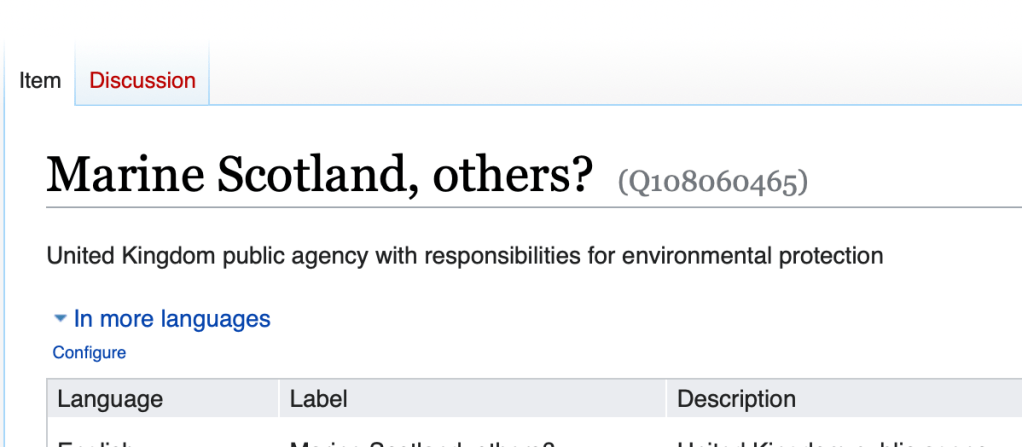
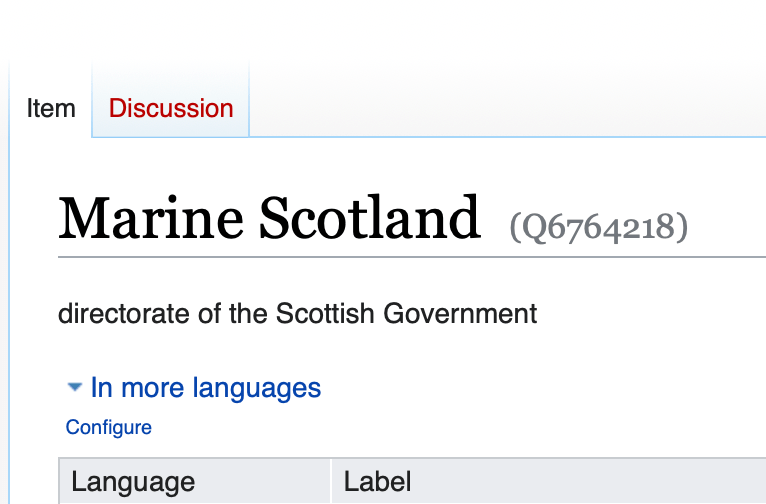
At the time of writing we have three Wikidata items for Marine Scotland. That is three items with their own QID each of which claims to be for the same entity.

Of course, by the time you read this blog post these three will now be one. So how do we do that?

We don’t generally delete wikidata items, since other items may point to them. What we would generally do, including in a case like this is merge them into one. By doing so redirects are put in place, meaning that any other items pointing to any of these three will point to the new merged site.

How to merge items

To merge items we need an extension called ‘Merge’. To obtain it click on the Preferences tab at the right of the wikidata page.

Then click on Gadgets on the ribbon menu.

Finally click on the check box next to Merge, under the Wikidata-centric heading.

Don’t forget to save your changes. You will be returned to the Wikidata item. You may need to refresh the page. Hover over the More link to the left of the search box at the top right of the page. You should see something like this with two drop-down options:

You’re now all set.

Open the items in separate tabs, or note the QIDs of the two (or more) items that require merging. I usually copy the QIDs to a text editor so I can retrieve them without retyping. I’ll grab the QID of the ‘best’ item, then go to the less good item. On the latter, click on Merge with.

You’ll get this dialogue box.

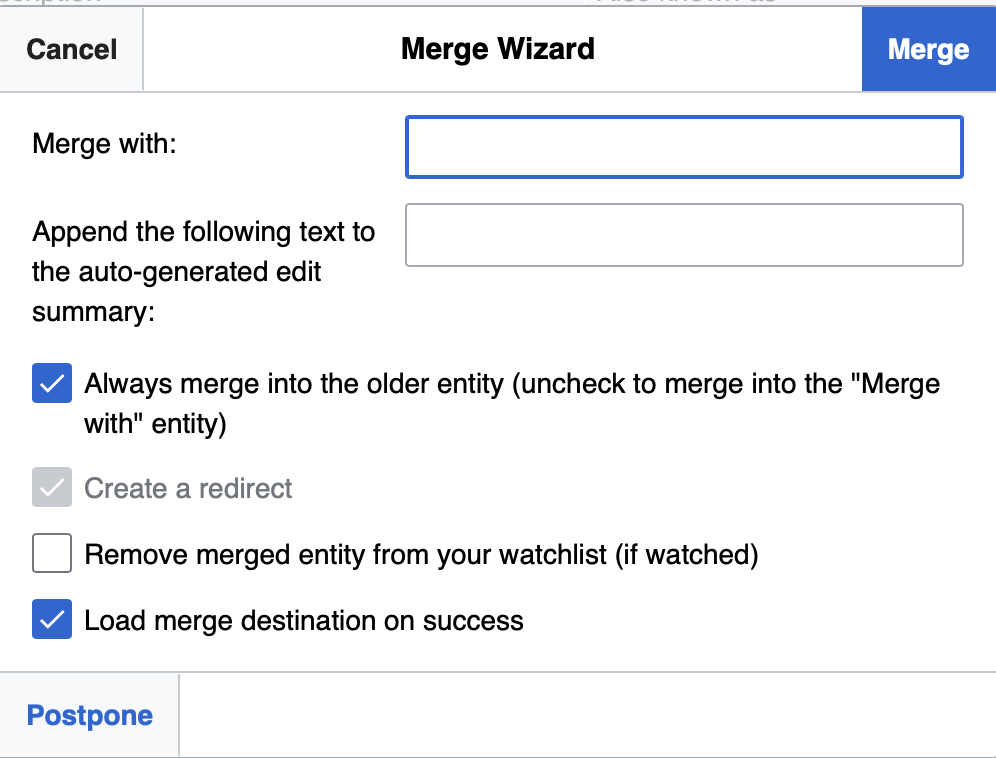
Enter the QID of the best one into the Merge with text field, and you uncheck the “Always merge into the older entity”. The latter is the default and depending on the result you want, you can end up with the QID of the newer, or inferior, item being used. It’s not critical, as we will see.

Click the blue Merge link (top right of the dialogue box) when you are ready.

The two items will now be merged into one, which will be loaded on screen. All links to that item will continue to work, and all to the now vanished item will point to the sole existing item instead,

If you have a third item repeat the process until you have one item left.

You may need to do a little tidying when you have completed merging. Carefully examine the new item – labels, descriptions and aliases in particular. But also check for duplicates, or even competing claims in other fields. Resolve these as well as you can.

You’ve now completed merging, and have provided a valuable service to to other Wikidata users!

How to make a custom WIkiShootMe page for missing images

One of the many WikiLabs tools that I use a lot is Wikishootme.

Wikishootme screenshot by https://tools.wmflabs.org/wikishootme/ - https://tools.wmflabs.org/wikishootme/, CC BY-SA 3.0, https://commons.wikimedia.org/w/index.php?curid=73548153
Wikishootme screenshot – CC BY-SA 3.0, https://commons.wikimedia.org/w/index.php?curid=73548153

This application is designed to be used on a mobile phone. It allows you to call up a map of where you are at the moment and find missing images of listed building (as red dots). You can then authorise the app, using your Wikipedia / Wikidata credentials, and click on a red dot to upload a photo that you either take there and then or from your phone’s media. The image goes straight to Wiki Commons with a CC-BY-SA licence. And, once uploaded, the photos are automatically linked to the wikidata entry for that item! Should that be automagically?

I had a bunch of projects where I thought it would be useful to generate a custom map with missing images (for example of plaques, or boundary stones), then encourage people to photograph them and add them. Thankfully, Wikishootme allows you to do that.

It turns out it’s not too hard to do. Here is a walk through.

1. Create your wikidata query

I’m going to use the March Stones of Aberdeen as an example. I suggest that you copy exactly what I do, creating this query in full through all three steps. Then when you understand how it works, substitute your own query.

In Wikidata’s Query Service, create the query to retrieve the data you want. Wikishootme is quite particular about column names in the final output, so we need to make sure that our query has columns called ‘q‘ (for the wikidata identifiers) and ‘location‘ for the coordinate locations.

SELECT ?q ?location WHERE{
?q wdt:P31 wd:Q921099; wdt:P131 wd:Q62274582 .
?q wdt:P625 ?location .
}

(For the purposes of this tutorial it is not necessary to understand the syntax of a SPARQL query. If you are curious, in the above query P31 means an instance of; Q921099 is the identifier for a boundary marker; P131 means located in the administrative entity; and Q62274582 is Aberdeen City)

Try it here

Test that your query runs ok and returns what you expect. The query above will generate a table with two columns – one labelled q with a list of Wikidata QID codes, and another, location with coordinate pairs for each item.

2. Grab the SPARQL

Next copy all of the code between the {} pair (i.e. all of the second and third lines of the query above, but without the curly braces.

Then head to https://urldecode.org, paste your query text into it, and click on encode.

This will create a stream of characters that can be passed as part of a URL to another service. Copy all of that text. When I encode the query above I get the following string:

%3Fq%20wdt%3AP31%20wd%3AQ921099%3B%20wdt%3AP131%20wd%3AQ62274582%20.%20%3Fq%20wdt%3AP625%20%3Flocation%20.

3. Generate the URL

We now need to append (or add) the encoded text to the end of the following URL.

https://wikishootme.toolforge.org/#lat=0&lng=0&zoom=1&layers=wikidata_no_image&worldwide=1&sparql_filter=

This is best done in a text editor.

So, when I paste the encoded string to the end of that, I get this:

https://wikishootme.toolforge.org/#lat=0&lng=0&zoom=1&layers=wikidata_no_image&worldwide=1&sparql_filter=%3Fq%20wdt%3AP31%20wd%3AQ921099%3B%20wdt%3AP131%20wd%3AQ62274582%20.%20%3Fq%20wdt%3AP625%20%3Flocation%20.

4. Try it out

Click on the link above. Did it work? It does for me. When I open it it defaults to a whole world map.

Default view of Wikishootme

Scroll and zoom to where your red dots are.

Wikishootme, scrolled and zoomed

Tip: when you get the map centred and at the scale you like, recopy the URL. This will capture the location and zoom level in your map for sharing.

Also, click on the layers symbol at the top right of the map. Choose to display where the data has images (green) as well as the red:

Wikishootme Layers control

That will change your view to showing red (missing) and green (captured) images for your wikidata items. This will give the URL such as this which loads the map correctly centred. at the right scale, and showing the layers you want.

Wikishootme showing red and green dots

Now you can share your map. I suggest copying your URL (see the Tip above) into a link shortener such as bit.ly so as to make sharing easier.

Now, when someone clicks on your URL they can click on a red dot, and upload a missing photo to Wiki Commons, and automatically link it to Wikidata – and turn those red dots green!

Header Photo by Ravi Roshan on Unsplash